Off Airport Ops Guide
Techniques for off airport operations
This guide was designed by the FAA Alaska Region FAASTeam and is geared towards wheeled aircraft, not specifically for float planes, but provides many helpful pieces of information that can help you prepare for mountain flying.
General Considerations: Off-airport operations can be extremely rewarding; transporting people and gear to locations that would be difficult or impossible to reach in any other way. Operating off-airport requires high performance from pilot and aircraft and acquiring the knowledge and experience to conduct these operations safely takes time. Learning and practicing off-airport techniques under the supervision of an experienced flight instructor will notonly make you safer, but also save you time and expense. Once you’ve acquired off airport skills you must use them continously or you’ll lose them. Regular practice is essential to staying at the top of your game.
Go lightly when operating off-airport. Operating at gross weight reduces aircraft performance, increases the probability of aircraft damage and may, in extreme cases, lead to structural failure. More trips with lighter loads are safer than fewer trips loaded to the maximum.
When evaluating a new landing site, or practicing before conducting seasonal operations, fly without passengers or cargo. Stow your survival gear as far aft as possible to avoid a forward center of gravity, while respecting the weight and balance limitations for your aircraft. Always file a flight plan detailing the specific locations you intend to explore. Make at least 3 recon passes at different levels before attempting a landing and don’t land unless you’re sure you have enough room to take off.
High Level: Circle the area from different directions to determine the best possible landing site in the vicinity. Check the wind direction and speed using pools of water, drift of the plane, branches, grass, dust, etc. Observe the landing approach and departure zone for obstructions such as trees or high terrain.
Intermediate: Level: Make a pass in both directions along either side of the runway to check for obstructions and runway length. Check for rock size. Note the location of the touchdown area and roll-out area. Associate landmarks with your landing area, to have a good sight picture to be used on final approach. Early morning or late afternoon sun casts shadows that yield the best conditions for determining rock size and, landing conditions. Similar to ski flying with an overcast sky condition, landing areas are very difficult to evaluate without shadows.
Low Level: Make a pass to check for cuts in gravel, rocks, dips, bumps, etc., that can’t be seen from directly above. It is important to be at an angle to the runway, not above it. Certain light conditions can make a bad site seem good. Check and double check any area not used before, or locations that have had high water since the last landing. Make another pass and roll one tire for a few feet to get a feel for the landing surface.
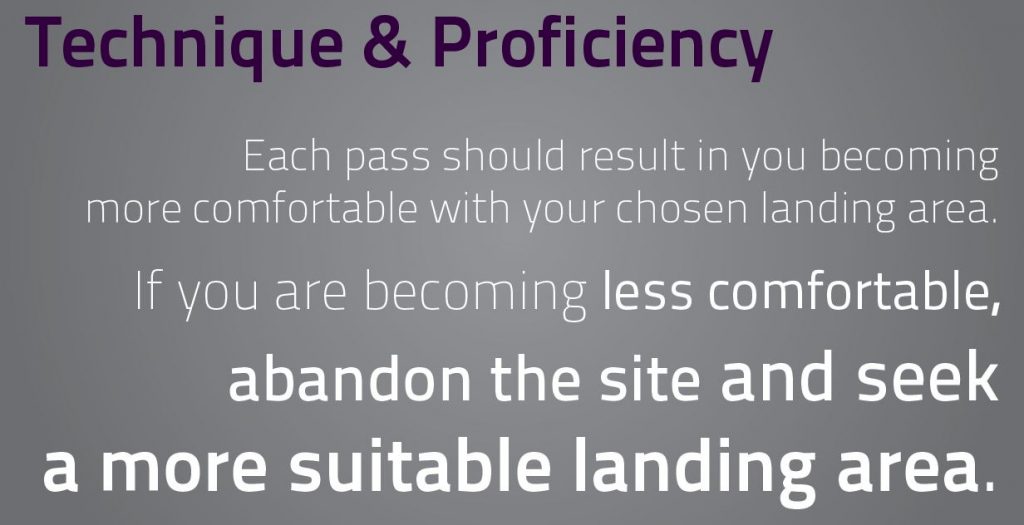
Each pass should result in you becoming more comfortable with your chosen landing area. If you are becoming less comfortable, abandon the site and seek a more suitable landing area.
Approach: Maintain a normal approach speed and no more than climb flaps until established on the final approach. Do not cut the final short. Make a stabilized short field approach, long enough to capture the landing zone site picture. Evaluate your approach and departure path before you commit to landing and insure that you have a safe escape path in case you need to go around. Align the approach to the runway, add full flaps, and slow to 1.3 Vso.
Landing: Maintain manufacturer’s recommended speed or no more than1.3 Vso all of the way to the touchdown unless wind gusts require more speed. Excessive speed on final will compromise short field landing performance. If you can’t land within one airplane length of your selected touch down spot – Go Around – and try an approach again.
Touchdown: Touch down in a tail-low attitude one aircraft length beyond the threshold. Reduce all power at the time the wheels touch the ground.
Roll-out: Steer to avoid obstructions, use minimal braking to prevent rock damage to the tail surfaces, and stop in a straight line when possible. Maintain aircraft directional control throughout the roll-out. Never relax until the aircraft has stopped. The most crucial time is usually just prior to coming to a complete stop. The aircraft decelerates faster, settling into the soft terrain. Be prepared to add power while holding the pitch control all the way back. The airflow from the propeller will assist in blowing the tail down to prevent nosing over. DO NOT USE BRAKES AT THIS TIME. Braking, if used at all, should only be done early in the landing roll.
Preparing the Site After Landing: Check the length by stepping off the usable area. Remove any obstructions, branches, or large rocks from the runway and turn areas. Fill in holes and level high spots if possible. Mark the obstructions that are not movable with natural materials of dissimilar color. Mark thresholds with branches or marks on the ground.
Turning: Make all turns with a minimum of power after proceeding forward. Never turn from a stopped position. It takes too much power, and propeller damage can occur. Shutting down and turning the airplane by hand is a good practice. Unloading and Loading: Unload the plane after stopping on roll-out. Do not taxi a loaded plane in loose gravel. Load the plane at the takeoff point. Do not load and then taxi into position.

Before Take-Off: Calculate takeoff and climb performance. This is not a time for guessing. You have to know what your performance will be before you commit to taking off. Be sure to calculate density altitude—remember: Hot -High -Humid, Density Altitude decreases aircraft performance.
For normally aspirated engines with Fixed Pitch Props– increase the sea level standard day takeoff distances by 15% for every 1000 feet of density altitude up to 8000 feet.
For Constant Speed Props– increase the sea level standard day takeoff distances by 12% for every 1000 feet of density altitude up to 6000 feet.
If you don’t have the means to weigh your moose meat in the bush you may find yourself wishing for more takeoff performance. Fortunately increased performance is easy to come by—just reduce the takeoff weight. Making more trips with lighter loads is safer than flying at max gross weight. More trips means more fuel though so be sure to have enough gas for the mission plus reserve.
Establish and mark a go/no go decision point for takeoff. One way to do this is to clearly mark the halfway point of your available takeoff area. Calculate 70% of your lift off speed i.e. 50 mph x .70 = 35 mph. Check your airspeed as you approach the decision point and if you’re less than 70% of lift off speed—abort. Reduce your load, lengthen your runway, or wait for more favorable takeoff conditions. For obstructed departures divide your takeoff area into thirds and mark the end of the first third. You now must have 70% of lift off speed at this point in order to clear a 50 foot obstacle at the end of the takeoff area.
Take-Off: Use the short or soft field techniques as listed in the aircraft flight manual. Climb straight ahead when possible using the best angle of climb until all obstacles are cleared, then continue as normal.
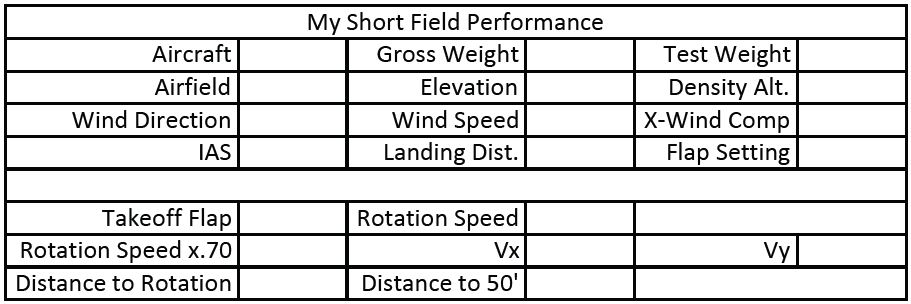
Calculating your short field performance
Instructions: Fly to an airport with a dirt or gravel strip. Load your aircraft to near maximum gross weight including typical gear such as your survival kit, and compute weight & balance for the test flight. Compute density altitude and note wind conditions. The loading should be at or slightly above your planned bush operating weight.
Fly several short field approaches & landings followed by short field takeoffs. Make full stop landings and taxi back to the same starting point. Have an observer note landing and take off distances. Compute an average for takeoff and landing performance and note this performance in the Short Field Performance Chart. Higher temperatures, elevations, and aircraft weights will decrease performance.
We suggest you document and record your short field performance annually. This exercise will also give you a chance to practice before going to the bush.
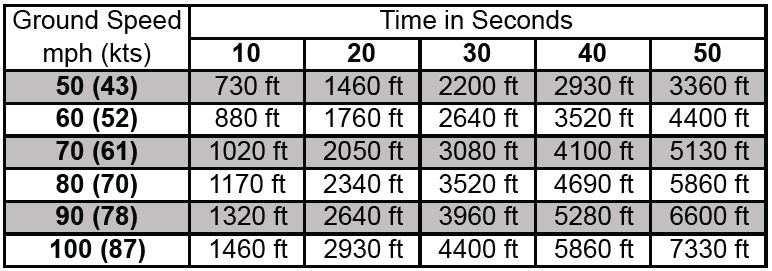
To determine the useful runway length, fly the length of your selected runway at one of the ground speeds listed on the chart. Read the runway length under the time in seconds column. In planning your required takeoff distance, consider a 50% safety margin. If performance for the situation requires a take off distance of 600 feet to clear obstacles, add 300 feet for a safety margin.