Tips on Mountain Flying
Safety Window
Mountain flying opens up new opportunities for the general aviation pilot for unique and interesting destinations, plus a view of spectacular scenery. However, mountain flying, even more so than flight in the flatlands, is very unforgiving of poor training and planning. There is a narrow window of safety that an untrained pilot can easily stray out of without the experience and knowledge gained from a recognized training program and a mountain checkout by a qualified mountain flight instructor. This publication is not intended to be a complete mountain flying training course. Instead, it can be used as an overview before you take recognized training or a review afterward. Recognized training for this type of flying is a must and you are encouraged to attend a recognized mountain flying course that includes adequate mountain ground and flight training.
What is Mountain Flying?
Rather than offer a definition of “mountain” flying, it should be pointed out that many of the subjects discussed in this publication can be found in nonmountainous areas or at low altitudes. For example, density altitudes over 8,500 feet can be found regularly on the eastern plains of Colorado in the summer. Also, dangerous mechanical turbulence and even mountain wave can be found in areas that aren’t usually considered mountainous. Of course, places like the Rocky Mountains are where all of these concepts can be experienced first hand and you should have mastered them before you attempt a flight through these areas.
Pilot Requirements
Because of the more demanding nature of mountain flying, you should carefully consider your experience and background before beginning a flight into mountainous terrain. First, it is essential that you consider attending a recognized mountain flying course to give you the knowledge and skills you will need to be safe. There are numerous recognized courses taught, usually in the summer months, and you can contact an FAA Flight Standards District Office in mountainous areas for references. Second, it is usually a good idea to wait until you have at least 150 hours of pilot in command time logged before taking mountain training. Pilots with this amount of time have usually had time to become more familiar and comfortable with the airplane and with planning flying trips. Mountain flying in many areas will stretch your abilities to fly the airplane proficiently, navigate, and deal with weather.
Aircraft Requirements
Mountain flying presents demands on both the pilot and the airplane that may require more performance than light training aircraft have to offer. There are, of course, stories that are told during hangar flying about flying very low power airplanes into high mountain airports. 160 horsepower should be considered minimum for the airplane with a pilot with minimum mountain experience. Even that, however, will greatly limit your ability to react to strong winds and the up and down drafts they may cause. The aircraft gross weight and its affect on performance should be carefully considered. A minimum of 60 horsepower per occupant should be considered minimum.
Weather Requirements
Ceiling Requirements
 It is suggested that you cross mountain passes at an altitude at least 1,000 feet above the pass elevation. Since this altitude will usually put you over 10,000 MSL, the cloud clearance requirement is at least 1,000 feet below the clouds. Hence, you should make sure that you have at least a 2,000 foot ceiling over the highest pass you will cross. Determining the actual ceiling in the mountains, however, can present some problems. There simply aren’t very many mountain weather reporting stations. Also, those that do exist are almost exclusively in valleys. Reported ceilings at a mountain valley airport may have to be 8,000 feet or higher to give 2,000 feet ceilings at the passes.
Determining the actual ceiling in the mountains, however, can present some problems. There simply aren’t very many mountain weather reporting stations. Also, those that do exist are almost exclusively in valleys. Reported ceilings at a mountain valley airport may have to be 8,000 feet or higher to give 2,000 feet ceilings at the passes.
Visibility Requirements
 Many experienced mountain pilots recommend having at least 15 miles of visibility before attempting mountain flights. Since your navigating will be primarily by pilotage and dead reckoning, good visibility will help keep you oriented in a sometimes confusing array of geographical cues.
Winds
 Strong winds can cause some of the most dangerous conditions you’ll have to contend with in the mountains. To minimize the chance of encountering dangerous turbulence, mountain flying should not be attempted if the winds aloft forecast at mountain top levels are greater than 25 knots. Above this level, potentially dangerous turbulence, as well as very strong up and down drafts are likely.
IFR and Night Mountain Flights
Experienced mountain pilots recommend that IFR and night flight in the mountains not be attempted. Instrument approaches and departure procedures require a highly skilled pilot and a very high performance airplane. Night obviously obscures most visual navigation cues, making terrain clearance difficult or impossible.
Weather Factors
Density Altitude
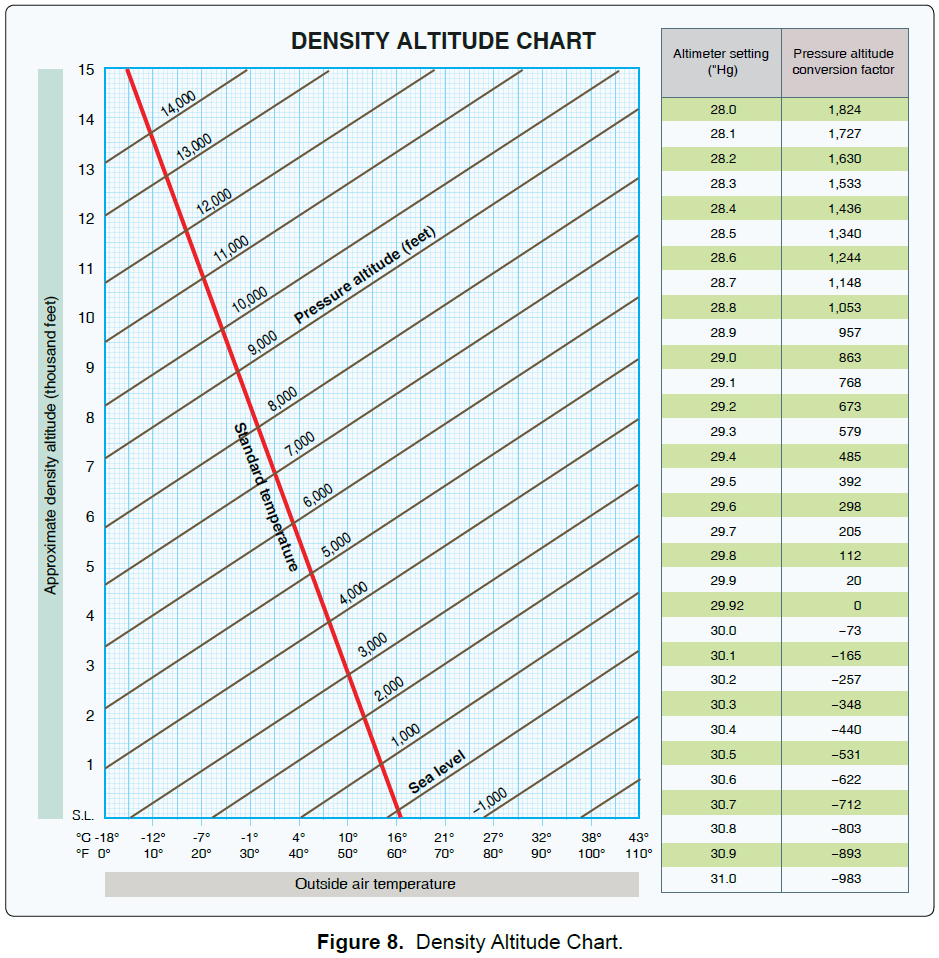
From your basic flight training, you probably remember that density altitude is the pressure altitude corrected for temperature. Since increasing temperature makes the air less dense, an airplane will perform as if it is at a higher altitude than on a colder day, given that the airplane is at the same height above sea level.
You should also remember that the standard lapse rate (the rate at which temperature normally decreases with increasing altitude in unsaturated air) compounds the problem somewhat. At sea level, the standard temperature is 59 degrees Fahrenheit, however, at 10,000 feet MSL, the standard temperature is only 23 degrees. This means that at Leadville, Colorado (elevation 9,927 feet) when the temperature is only 24 degrees, the density altitude is already above the field elevation. We will discuss density altitude in more detail later.
Winds Aloft Reports
The winds aloft reports are very important to your mountain flight planning process. You should pay close attention to the forecasts at and above the mountain ridges of the terrain you will be flying into. In the west, that usually means the 9,000 and 12,000 foot forecasts. In the east, you will look at lower winds. Winds above 25 knots at these levels should be a warning sign that should cause you to think about delaying your trip.
High and Low Pressure Patterns
As you analyze the mountain weather before your flight, pay special attention to the position of the highs and lows to give clues to the wind speed potential. For example, in the winter, a high often sets up over the Four Corners area in southwest Colorado. This is often coupled with a low pressure centered in eastern Colorado or western Kansas. The result can be very strong westerly winds and dangerous turbulence in the high terrain for days at a time.
Mountain Wave
When the wind speed is above about 25 knots and flowing perpendicular to the ridge lines, the air flow can form waves, much like water flowing over rocks in a stream bed. The waves form down wind from the ridge line and will be composed of very strong up and down drafts, plus dangerous rotor action under the crests of the waves. If enough moisture is present, lenticular clouds can form to give a visual indication of the wave action. These clouds are reported in the remarks section of hourly sequence reports as ACSL (altocumulus standing lenticular) or CCSL (cirrocumulus standing lenticular).

Winds Through Passes
Just as the flow through a carburetor speeds up in the restriction of the throat, wind flowing through the narrow restriction of a mountain pass will also speed up. When the winds are forecasted above about 20 knots, be aware that the speed in passes may cause turbulence and drafts that should be avoided.
Orographic Lifting
As the wind blows moist air upslope, it will cool and may form clouds. If, as is often the case winter, the air is stable, the clouds will stay close to the mountain, forming a “cap” cloud. However, if the air is unstable, as is usually the case in the summer, this initial lifting will be enough to start convection and result in thunderstorms forming.
Microbursts
Microbursts have received much space in the aviation and popular press in the past several years because of their implication in many serious airline accidents. Many light aircraft accidents have also been caused by these events. The wet microburst is found in the middle of an active thunderstorm or intense rain shower and avoiding the strong downdraft is relatively easy. The dry microburst, however, is somewhat more insidious because it occurs with little or no warning in the clear air beneath virga. Dry microbursts are common in and near the Rockies and other mountainous areas of the western U.S. in the summer. The formation of the dry microburst is likely when thunderstorms with bases above about 3,000 to 5,000 feet AGL exist and the temperature/dew point spread on the surface is more than about 40 degrees. If dust is blowing underneath one of these high based thunderstorms, stay clear until the event passes (usually only a few minutes).
Temperature Inversions
Mountain valleys are often conducive to the formation of temperature inversions and valley fog at night. This should play a part in your arrival and departure planning. Since the inversion breaks and the fog dissipates by late morning, you may have to delay slightly at some airports.
Density Altitude
Effects on the Airplane
There are numerous ways that density altitude affects the airplane. For example, a normally aspirated engine will lose 3% of its power per thousand feet of density altitude increase. Next, as density altitude increases, the wings have less dense air with which to create lift. Since a propeller is an airfoil, it, too, will be less efficient.
Effects on Performance
All of these factors affect the overall performance of the airplane. At higher density altitudes, takeoff and landing distances are increased, rate of climb and actual service ceiling are decreased, true airspeed is higher for a given indicated airspeed, and turning radius is larger at high altitude at a given indicated airspeed.
To help regain some of the lost takeoff and landing performance at high density altitudes, you should reduce the weight at which you fly the airplane to no more than 90% of maximum gross weight. For a typical light airplane with a maximum gross weight of 3,000 pounds, reducing the loaded weight to no more than 2,700 pounds will regain much of the lost performance. A check of your airplane’s performance data should show that takeoff and landing distances, climb rates, and single engine performance for multiengine aircraft is greatly improved at this reduced weight. Turbocharged aircraft will gain some improvement, but it will be somewhat less than that gained by non-turbocharged aircraft.
Since your true airspeed is higher for a given indicated airspeed, many pilots will respond to the visual cues of higher ground speed on takeoff by rotating at a lower IAS than normal. Instead, you should use the same IAS for takeoffs and landings as you would at sea level (or that the Pilots Operating Handbook specifies). Rotating at too slow an airspeed may cause the airplane to take an even longer ground run than necessary.
Turning radius is proportional to the square of true airspeed. For example, if you increase your TAS by only 10%, your turn radius will increase by 20%. In the pattern this may result in a wider than expected turn to final resulting in overshooting. At high density altitudes, many pilots will fly slightly wider patterns to account for the wider turns.
Higher density altitudes also affect best rate and angle of climb airspeeds. Best rate of climb IAS decreases as altitude increases, while best angle IAS increases slightly. Refer to your airplane’s handbook to be sure you are flying the correct airspeeds to get the performance you expect.
Planning A Cross-country Flight
Any cross-country flight requires careful preparation, but a mountain cross-country trip deserves even greater attention to detail.
Weather
A clear understanding of the weather conditions is essential for a safe flight into mountainous terrain. However, weather reporting stations in the mountains are sparse and getting a good briefing just from hourly weather service observations is difficult. You may need to phone some of the airports over which you will be flying to get current conditions. Pilot reports are also very helpful and you should give them as you fly along your route.
Route Selection
Mountain route selection is much more than drawing a straight line between your departure and destination airports and filing “direct”. A better route is usually found by following highways, river drainages, and valleys. These routes will usually be lower and offer better emergency landing sites. Also, you should check with local experienced pilots if you are planning a trip into an unfamiliar area to get recommendations on routes to use.

Flight Plans and Logs
Your trip into the mountains will usually be VFR, dictating pilotage and dead reckoning navigation. To plan for this type of flight, you will need to prepare a log with times and headings to fly between checkpoints. This may seem like a nuisance to be used by student pilots, but it will keep you from fumbling with charts and guessing once in flight, possibly leading to disorientation and getting lost.
As you plan your desired route, also consider what alternate routes or airports may be available in the event of an emergency. If the weather is marginal, make sure you have a clearly defined alternative if it deteriorates to the point that you cannot continue to your destination.
Once you’ve planned your flight, you should also file (and then activate once airborne) a flight plan with the local flight service station. If, for some reason, you must make an off airport landing, having a flight plan activated will get search crews out looking for you quickly and improve your chances of survival. If for some reason you must change your planned route, be sure to update your flight plan with flight service.
Usable Frequencies
When planning your flight, study the VFR charts for the frequencies and locations to use for making position reports and getting weather updates. In many mountainous areas, Flight Watch will not be usable, so you will need alternatives. In most places, you will be able to reach a flight service station through an RCO or VOR site. Have these frequencies written on your flight log for ready reference when you need them.
Winter Operations
Winter operations at mountain airports may present some things that you aren’t normally faced with in the flatlands. Check the NOTAMs carefully for any unusual runway conditions due to snow, ice, or other hazards. If you will need engine preheat services or de-ice services, call ahead since some smaller airports do not have these available. Finally, if your destination is a popular ski country airport, you may find parking space limited or simply not available. Again, a call ahead may save a change in plans.
Operations During A Cross-country Flight
Starting, Taxi, and Run-up
Starting and taxi at high altitudes are performed as you would at sea level, except you must lean the mixture significantly to avoid fouling the spark plugs. Run-up is also normal except a full power run-up of nonturbocharged engines should be used to set mixture for takeoff power. The POH should be followed strictly for turbocharged engine operation.
Takeoff
For takeoff, the minimum flap setting recommended by the POH is usually recommended for best performance. A full power check should be performed on the runway, adjusting mixture for best power if necessary, and checking for proper engine RPM, manifold pressure, and fuel flow. As discussed earlier, rotation and liftoff should be at normal indicated airspeeds. It is important not to over rotate to avoid high drag and poor takeoff performance.
Climb
A normal climb profile is usually sufficient for most mountain airports you will visit. Your POH should be the guide for selecting the proper speeds for the conditions. For most light aircraft, the initial climb will be at the best rate of climb IAS until reaching at least 1,000 feet AGL, then a smooth transition to cruise climb. There are some conditions, such as climbing out of airports in deep mountain valleys, when you may need to use the best rate of climb airspeed until reaching cruise altitude, but those conditions are relatively rare. Monitor pitch attitude, airspeed, and climb rate during the climb to make sure you are getting the best performance from the airplane.
An engine failure right after takeoff is a serious situation any time. In almost every case, with less than 500 feet of altitude, you should not attempt to return to the airport. Make an off airport landing straight ahead, maintaining control of the airplane until landing.
Ridge and Pass Crossing
On most mountain flights, you will need to cross at least one ridge or pass. Experienced pilots recommend crossing a ridge or pass at the ridge elevation plus at least 1,000 feet. If the winds at mountain top level are above 20 knots, increase that to 2,000 feet. Plan to be at that altitude at least three miles before reaching the ridge and stay at that altitude until at least three miles past it. This clearance zone will give you a reasonable safety zone to avoid the most severe turbulence and down drafts in windy conditions.
If conditions or airplane performance dictate, you may need to fly along the windward side of a ridge to find updrafts for gaining altitude before crossing a ridge. You may also need to circle before reaching the ridge if climbing out of a valley airport.
When you actually cross a ridge, you should do so at a 45° angle to the ridge. This allows you to turn away from the ridge quicker if you encounter a severe downdraft or turbulence. Once you have crossed the ridge, turn directly away from it at a 90° angle to get away from the most likely area of turbulence quickly. Plan your crossing to give yourself the ability to turn toward lower terrain quickly if necessary.
Enroute Considerations
As you fly your mountain trip, continually visualize what the weather and winds are doing so you can take best advantage of them. For example, if flying in a valley, it is usually best to fly on the side of the valley that will have the updrafts, the side the wind is blowing toward. Turbulence due to the rough terrain may make the flight uncomfortable, but may also require that you fly at maneuvering speed. Remember that maneuvering speed decreases as the airplane’s weight decreases. You should know what your maneuvering speed is for the weight at which you are flying and be able to go to it quickly if you encounter rough air.
Pilotage and dead reckoning will be your primary type of navigation. VORs are usable in limited areas, but suffer from limited range and other problems. LORAN and GPS systems work quite well, however, and can be used effectively to maintain your positional awareness.
Descent
When you first arrive over a mountain airport, take a good look around before you descend to it and plan your departure track. Look for escape routes and emergency landing sites in the event of an engine failure right after takeoff. Also, study the terrain you will have to climb over as you depart.
Plan your approach path as you start your descent. Some mountain airports are confined in valleys that make a normal approach difficult. Study your options before committing to a lower altitude.
Approach and Landing
Approach and landing should be normal at most mountain airports. Plan to fly a stabilized approach to the desired touchdown spot. Since mountain winds are sometimes tricky, be aware of windshear and go around if necessary.
Emergency Procedures
Even the best prepared pilots may someday find themselves caught in an emergency situation that will require quick thinking and excellent skill to save themselves and their passengers. Even though these situations cannot be totally prepared for, there are some things you can do to increase your chances of handling the problem in the best way possible.
Survival Equipment
There are volumes written on what type of equipment to carry for survival in the event of a forced landing and you should take the time to use these sources to put together a good survival kit before launching into the mountains. At a minimum, however, you should have food and water for each occupant of your airplane to last at least three days, winter clothing for each occupant, a medical kit to stabilize crash injuries, and signaling devices. Your food supply might be as simple as granola bars, but camp supply outlets will have other options. You can pick up water in plastic bottles at a food store. To survive after an off airport landing, you must stay warm and dry, so good winter clothing like parkas and boots will be necessary. Remember that even though it may be summer in the valleys, the mountain tops will still get quite cold at night. A medical kit should contain basic supplies like bandages and pain relievers. If any of your party takes prescription drugs, you should consider carrying a supply of them. Signaling devices can be as simple as a military style signaling mirror (the glass type), which is highly effective, or a standard aircraft-band handheld transceiver.
Oxygen Use
In most cases, you will be flying at altitudes below those which regulations require oxygen use. However, you should review the symptoms of hypoxia and if you are susceptible to it because of smoking or other conditions, have supplemental oxygen on board and use it.
Deteriorating Weather Enroute
A particularly difficult situation for most pilots to deal with is weather that deteriorates enroute. The urge to continue is very strong, with the thought that it will get better if we just continue a little farther. However, continuing is often the worst thing you can do. When the weather begins to deteriorate, begin to consider what your options are. Your flight planning should have included planning for alternate routes or airports and those should be exercised before getting into poor weather. Divert to an alternate airport or return to your departure airport and reconsider the weather conditions.
If the weather closes off all other possible options, the best thing to do might be to make an off airport landing. Making a landing under control while you still have enough visibility to select a good site is preferable to continuing into poor weather and crashing into terrain that you can’t see.
Engine Failure
Sudden engine failure should be planned for and practiced during recurrent training with a competent instructor. You’ll need to know the first few things on the checklist by memory since you may be closer to the ground than usual and may not have time to dig out the POH checklists. As you fly along, pick out possible emergency landing sites before any problems arise and form a continuously updated course of action so you are prepared if the engine really does fail.
The exact procedure to follow when an engine fails is different for each type of aircraft, so know what yours is. In every situation, though, your first duty is to fly the airplane! Next, turn immediately toward lower terrain to increase your altitude above ground and possibly give you a lower (and warmer) site to land. Try to select a site near habitation or a road.
Your landing site may be on a slope. Landing uphill will reduce the ground roll and reduce the chance of falling off an embankment or cliff.
Landing in a forested area presents some difficult choices. In the western U.S., most of the mountain forests are tall evergreen trees, with a few smaller trees like aspen. If you mush into the tops of tall pine or cedar trees, the airplane may stop, caught in the tree tops, then nose over, falling the last 50 to 100 feet nose first. A better choice is to select an aspen grove that will have trees that are much more flexible that will dissipate the airplane’s energy without doing as much damage to the cabin area.
Before landing, secure all seat and shoulder belts securely. Open the cabin door and emergency exits to keep them from becoming jammed in the crash. If possible, before touchdown turn off fuel, battery, and ignition switches to reduce the chance of fire.
Survival After Landing
After landing, get everyone out of the aircraft immediately until you are sure there is no chance of fire. Next, make sure that the emergency locator transmitter is turned on. If a handheld radio is part of your survival kit, use it to attempt contact with an FAA facility or an overflying aircraft. Stay warm and dry, and above all, stay with the airplane! Time and time again, searchers have found people who have survived the crash only to die trying to walk to safety. Carry a good survival kit, plan well, and file a flight plan and your best choice will be to stay with the airplane until searchers arrive.
Emergency Summary
As with any type of flying, always leave yourself a way out. If things begin to go wrong, take prompt corrective action. Don’t let yourself get caught flying into a worse situation. If you get into an emergency situation, don’t hesitate to declare an emergency. Get all the help you can working for you. And finally, save the people and sacrifice the airplane. An airplane can be replaced, but your family and friends can’t.
The Pilots Operating Handbook
Your POH contains a wealth of information about your airplane. Because of the demands mountain flying places on both pilot technique and airplane performance, you should spend time with your POH learning how to get the most from your airplane. You will need to know exact speeds for takeoff and landing at the weights you’ll be using, best rate and angle of climb speeds and how they change with altitude, best glide speeds, and maneuvering speed at various weights. You should also pay close attention to takeoff and landing runway requirements at the high density altitudes you will encounter. Make a log of what you find so you can refer to them quickly.
Summary
As you can see from this brief overview of mountain flying, there is a lot to consider when planning trips into the high country. Without the proper training, you put yourself and your passengers at increased risk unnecessarily. A recognized training program that gives you the knowledge and skill to be safe in the mountains will also improve your overall flying proficiency. Please take the time to get the training you need to be safe and enjoy your mountain flying experience.

References
F. Caracena, R. L. Holle, and C. A. Doswell III, Microbursts – A Handbook For Visual Identification, U.S. Department Of Commerce, February, 1989
Federal Aviation Administration Accident Prevention Program, The Impossible Turn, U.S. Department of Transportation
Federal Aviation Administration Accident Prevention Program, Wind Shear, U.S. Department of Transportation Colorado Pilots Association, Colorado Mountain Flying Course
Northwest Mountain Region, Denver Air Route Traffic Control Center, High Mountain Flying In Ski Country U.S.A.
Advisory Circular AC-0057, Hazardous Mountain Winds and their Visual Indicators
Advisory Circular AC 61-23C, Pilot’s Handbook of Aeronautical Knowledge
FAA-P-8740-2, Density Altitude
FAA-P-8740-5, Weight and Balance, An Important Safety Consideration for Pilots
FAA-P-8740-13, Engine Operation for Pilots